
Build a small, understandable map first. A starting point, an encounter, a door and an ending teach you more than filling an arena with fifty disconnected events. This guide takes you from that first room to reusable defense assaults, with examples you can adapt to your own maps.
You do not need to write code. The examples use the editor's placement tools, property dialogs and event connections. Keyboard shortcuts below refer to the default bindings. You can also use the visible buttons.
Version check: this guide covers v0.63.58. Some screenshots show the newer defense, map-size and Logic tools. If your public build is older, those controls may not be available yet. Existing maps keep their saved dimensions; they are not stretched when opened in a newer editor.
Start with the right kind of map
Enter Sandbox, open the editor, and choose MAP → Overview. Give the map a useful name and a short description: what does the pilot do, and what counts as winning?
Choose Game Mode before tuning the scenario:
| Mode | What drives the run | Best use |
|---|---|---|
| Custom | Your objects, spawners, conditions and events | Missions, tutorials, puzzles and tower defense |
| Survival | Survival rules plus your map and wave settings | Testing arenas, pacing, rosters and difficulty |
| Boss Rush | Boss encounters plus your map and fight settings | Testing boss sequences and encounter spaces |
Custom is the only mode that can currently be published to the Map Hub. Survival and Boss Rush authoring are local tuning tools.
Choose Map Size in Overview. Large is twice the original width and twice the original height: four times the area, arranged like a 2×2 set of the old arenas. New Sandbox maps start Large. Standard keeps the original footprint. Size belongs to the entire map; every Survival wave or Boss Rush fight uses it. You cannot make wave two a different-sized arena.
Resizing does not move your objects. If shrinking would leave an object or route outside the arena, move it inside first. Choose your footprint early so you spend your time designing encounters instead of relocating them.
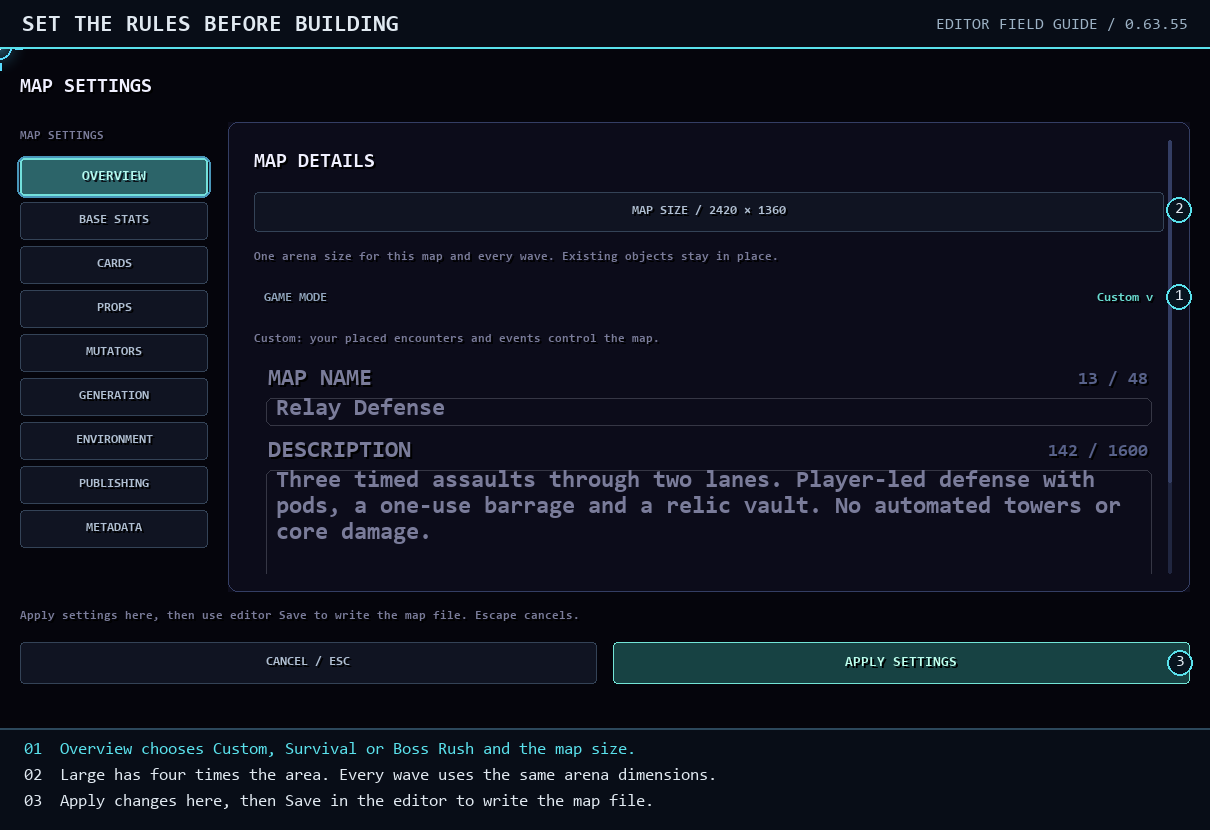
Choose the mode and map size before building the layout. Apply the settings, then save the map to keep those changes on disk.
Read the workspace
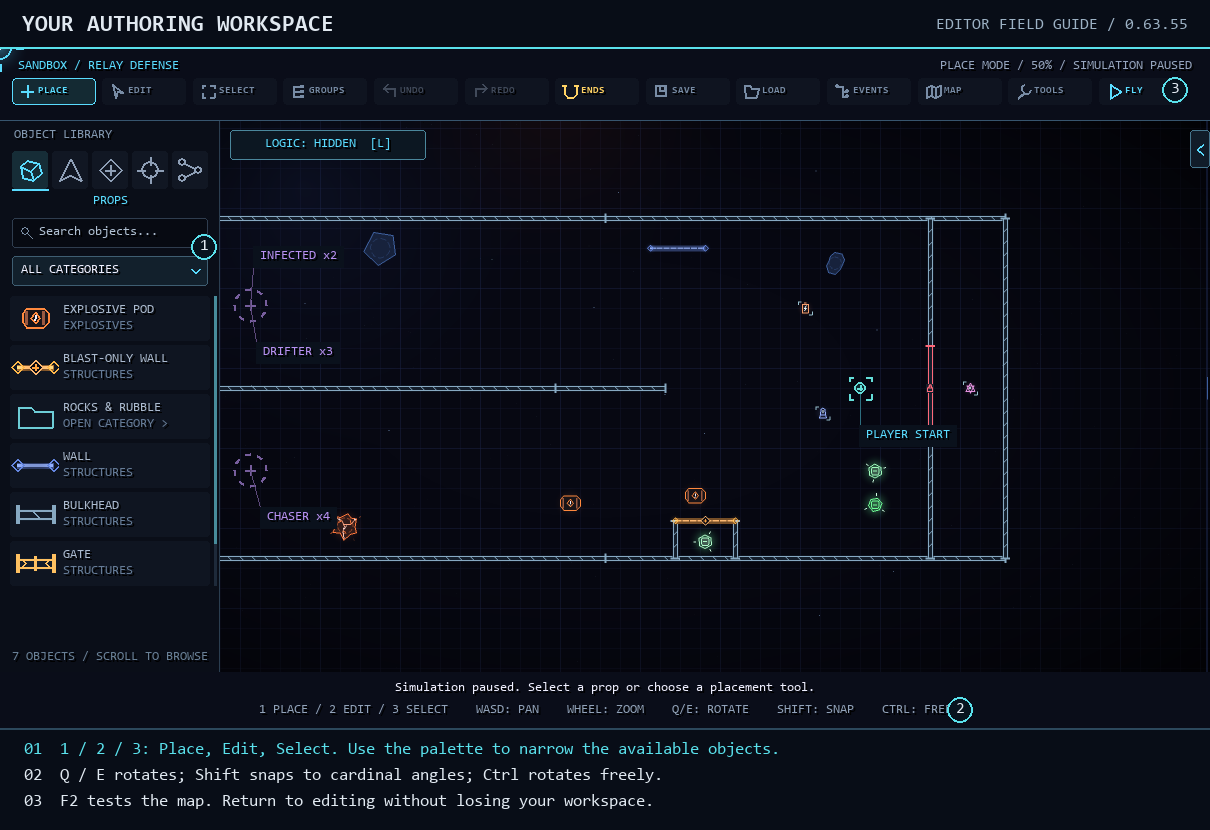
The editor separates choosing an object, placing it in the arena and editing its properties. Click an image in this guide to enlarge it.
The top toolbar holds Place, Edit, Select, Groups, undo/redo, saving/loading, Events, Map settings, Tools and Fly. The left catalogue holds what you can place. The right inspector edits the selected item. Collapse it when you need more room.
The live Prop Budget bar in the header shows how much of the 250-object physical-map allowance you have used. It counts rocks, walls and pickups across every wave layer—not only the layer currently visible. Event nodes, event connections, spawners and spawn trigger areas use separate limits and do not fill this bar.
The catalogue uses icon categories for Units, Props, Pickups, Spawns and Events. Narrow the subcategory or use search rather than scrolling through every rock variant. Map-wide logic, dialogs, notes and defense nodes belong under Events; rocks and structural cover belong under Props.
A new blank arena includes a Player Start in the middle. Move it to your intended entrance. The editor does not need a live ship: entering Fly creates the pilot at that start. Leave enough empty room for the ship and its first movement.
Place, edit and select
| Action | Default control | What it does |
|---|---|---|
| Place mode | 1 | Choose an item, aim its preview and click to place |
| Edit mode | 2 | Select an item and change its properties |
| Select mode | 3 | Select several items for arrangement or grouping |
| Pan the editor | WASD | Move the camera around the map |
| Zoom | Mouse wheel | Get close for precision or pull back for layout |
| Rotate | Q / E | Turn in 15-degree steps |
| Cardinal rotation | Shift + rotate | Snap to cardinal orientations |
| Free rotation | Ctrl + rotate | Rotate continuously |
| Undo / redo | Ctrl+Z / Ctrl+Y | Step through supported authoring changes |
| Copy / paste | Ctrl+C / Ctrl+V | Create one movable copy on the chosen wave/range |
| Editor ↔ Fly | F2 | Test the map or return to editing |
| Logic browser | L | Find nodes and control connection visibility |
Use the placement preview to see the snap before committing. Rotate long walls and directional hazards while the preview is still attached to your cursor. A pasted arrangement also arrives as a preview, so you can position and rotate it before placing the copy. In Survival and Boss Rush, first choose a destination wave or range; the preview names it, and a click creates exactly one destination-layer copy.
Click a numeric inspector value to enter an exact number. Use the option picker for a discrete choice such as enemy type. Do not repeatedly click through a long list hoping to reach the right value.
Multi-selection and grouping solve different problems. Select matching object types when you want to change shared properties together. Group mixed objects when you want to keep a room, encounter or defense position organized. Open the Groups tree to find a group's contents without hunting for them on the map. A group is an editing convenience; it does not automatically make every member activate together.
When copying a connected arrangement, its internal references are remapped to the copies. Still inspect the result: relationships to objects outside the copied selection are excluded and should be rebuilt or checked before testing.
Build readable space
Start with a floor plan a pilot can understand at speed. Put the entrance at one end, the objective somewhere visible, and give enemies a clear way into the fight. A wide route with one meaningful gate is easier to test than a maze of tiny gaps.
Useful props include:
- Walls: choose the supported structural type, health and respawn behavior. Indestructible cover cannot be shot away; destructible or broken walls can. Blast-only walls require explosive damage.
- Locks and barriers: use a shootable lock when firing should open the passage. Use an event-locked door when a pickup, condition or other event must open it.
- Rocks and rubble: choose a family, shape and size. Large movable rocks are heavy. Anchor a rock when it must stay fixed; do not rely on movable rubble to seal a mandatory objective room.
- Explosive pods and hazards: useful for danger and environmental interactions, but give the pilot room to react.
Health is not a substitute for layout. If a mandatory key is behind the door that requires it, no amount of tuning makes the map playable. Keep starts clear, verify both ends of every passage, and test with the actual ship rather than judging a gap only from the zoomed-out editor.
Set up spawners and paths
Choose a spawner variant before placing it. An invisible spawner provides an arrival point without a shootable body. A destructible spawner is an object the pilot can attack; it has health and a respawn timer. Do not confuse the body's respawn timer with the interval between enemy batches.
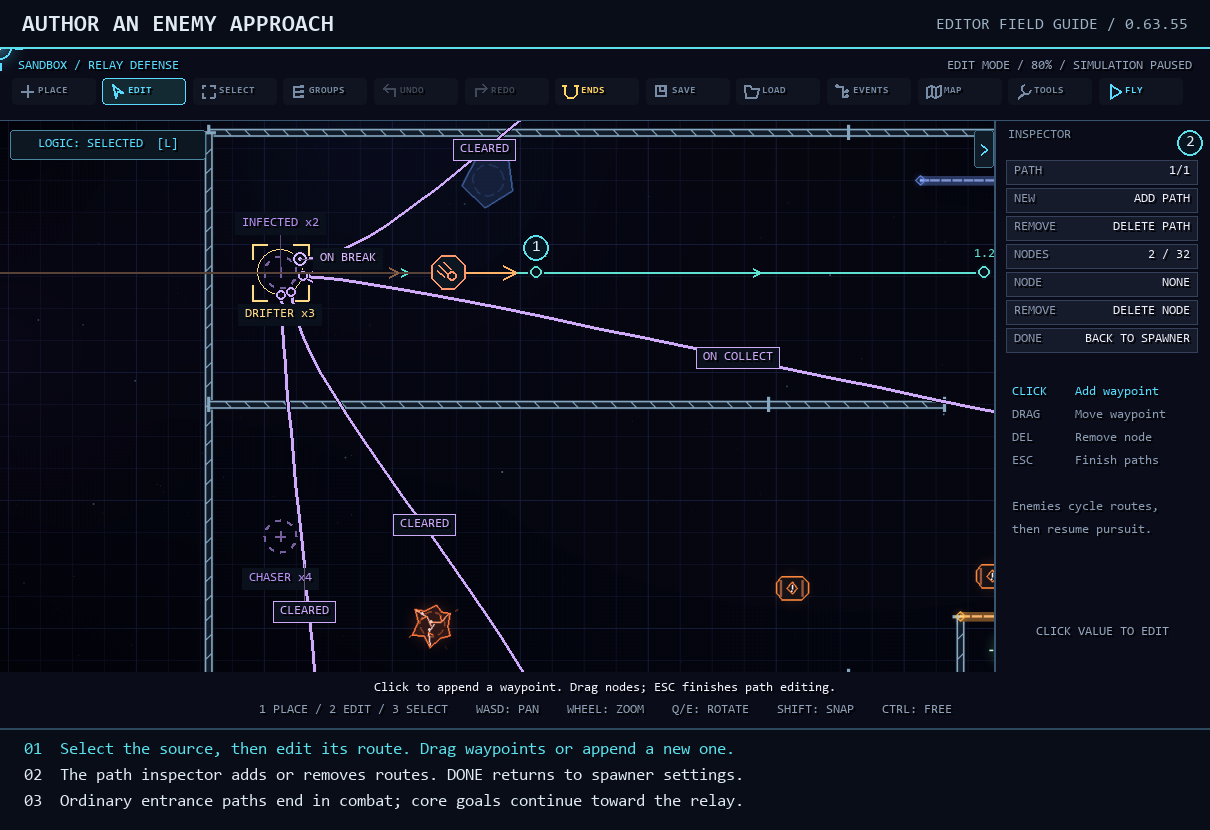
The path controls where the batch travels after arriving. The selected source makes its route easier to inspect and edit.
Configure these first:
| Property | Meaning | A simple test value |
|---|---|---|
| Enemy | Which unit arrives | MINI |
| Count | Units in a batch | 2 |
| Trigger | Whether arrival begins on start, delay or a linked event | Linked/event activation for a staged mission |
| Delay | Wait before the batch arrives | 0 seconds |
| Repeat | Whether more batches follow | Off for the first test |
| Frequency | Time between repeating batches | 8 seconds when testing repeats |
| Max batches (repeat limit) | Maximum total batches, including the first | 3 for a short finite encounter |
| Enabled | Whether the source is allowed to run | On |
Open Paths / Edit and lay out waypoints. A spawner can have more than one approach path. When its source is selected, hovering and selecting the route gives you a quicker way back into path editing. Keep corners and exits wide enough for the actual enemy bodies.
An ordinary entrance path eventually hands the enemy back to its combat behavior. It does not turn its endpoint into a defendable objective. For enemies that must reach a core and cause a leak, set the Goal as described in the defense example below.
Authored units can use Aggressive, Passive or Patroller behavior. Aggressive units engage within their configured awareness; passive units wait without attacking; patrollers follow their authored patrol route. These are encounter tools, not a guarantee that a blocked route is safe. Test around walls and locked barriers.
Start with one non-repeating batch. Only add repeats after that batch reaches the intended room and its completion behaves correctly. Use Stop Repeat from an event to stop future repeats; do not assume stopping a spawner removes enemies it already created.
Understand events and connections
Think of each rule as a sentence:
WHEN something happens → THEN do something → FIRE once or repeatedly.
The source supplies a signal: Map Start, collection, destruction, a timer expiring, a condition becoming true, or an assault clearing. The destination supplies an action: show a dialog, open a door, start a spawner, change a variable, finish the map or fail it.
Place the relevant node under Events, then configure it in the inspector. Use OUTPUT / Connect Node for direct map connections, or use the EVENTS screen to manage map-wide rules. The available choices depend on the selected game mode and the source/target type.
Give nodes names that explain intent: Welcome briefing, Unlock extraction, Extraction deadline. Add author notes to explain why a rule exists or why it fires only once. Those notes travel with the saved map and are visible to other editors, but do not appear during play.
When a Condition or Map Variable asks for a key, use the complete Sandbox variables and condition-keys reference. It lists every current run.*, profile.*, achievement and defense.* metric, along with the rules for author-defined var.* counters.
Three different kinds of text: author notes document the map; Dialog pauses the game for a message; Map Note shows a pilot-facing banner while play continues. Choose the one that fits the moment.
Use Once per map run for a tutorial prompt or one-time objective. Use repeated firing only when you intend repeated effects. A collectible being collected and a note disappearing are not the same event; a timed-out banner should not award objective completion.
Untangle a busy logic graph
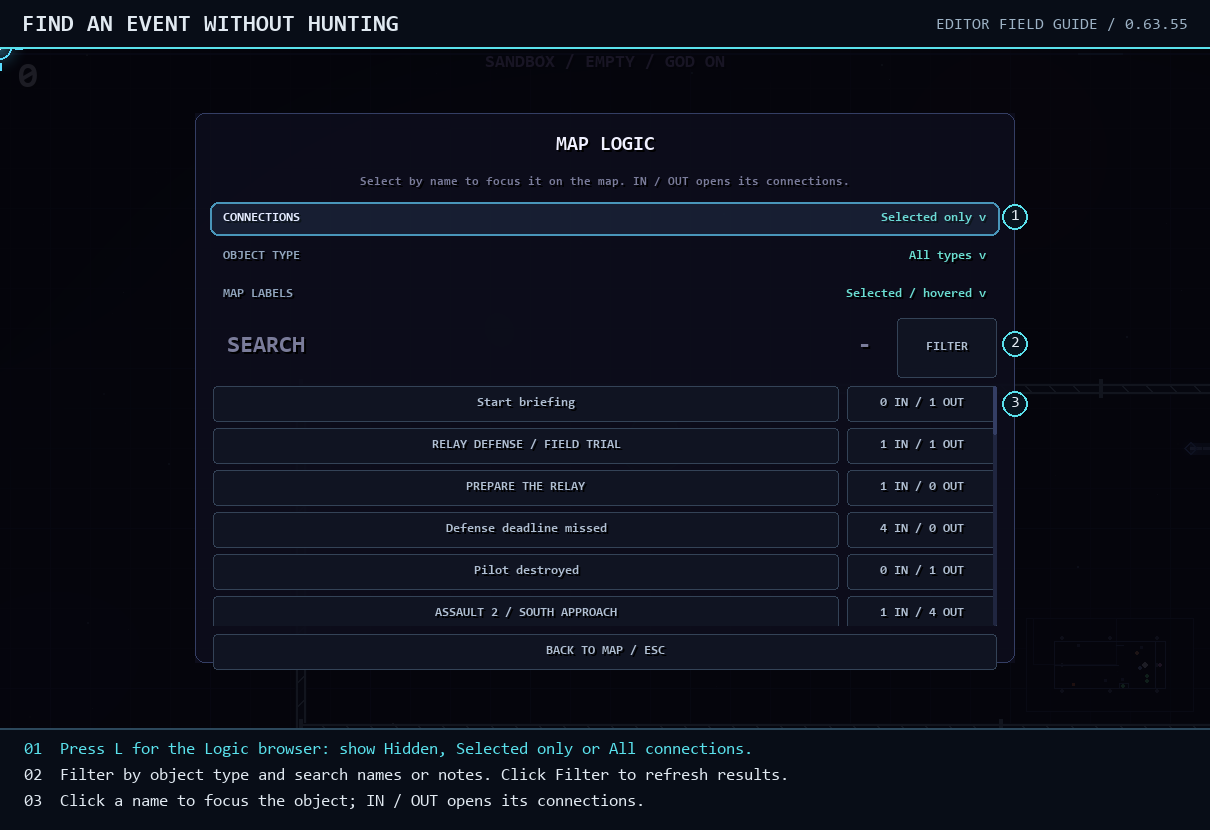
Use the named list to select a node, then inspect its incoming and outgoing rules. This is much easier than selecting a tiny icon beneath several wires.
Press L or use Logic. Search by name or author notes, narrow the type filter, and select the node from the list. You can focus its source or destination and edit the rule from there.
Connection visibility has three useful working states:
- Selected: concentrate on the selected object's connections. Use this while authoring a single chain.
- All: inspect the whole graph when checking how systems join together.
- Hidden: clear the wiring from the map while arranging scenery.
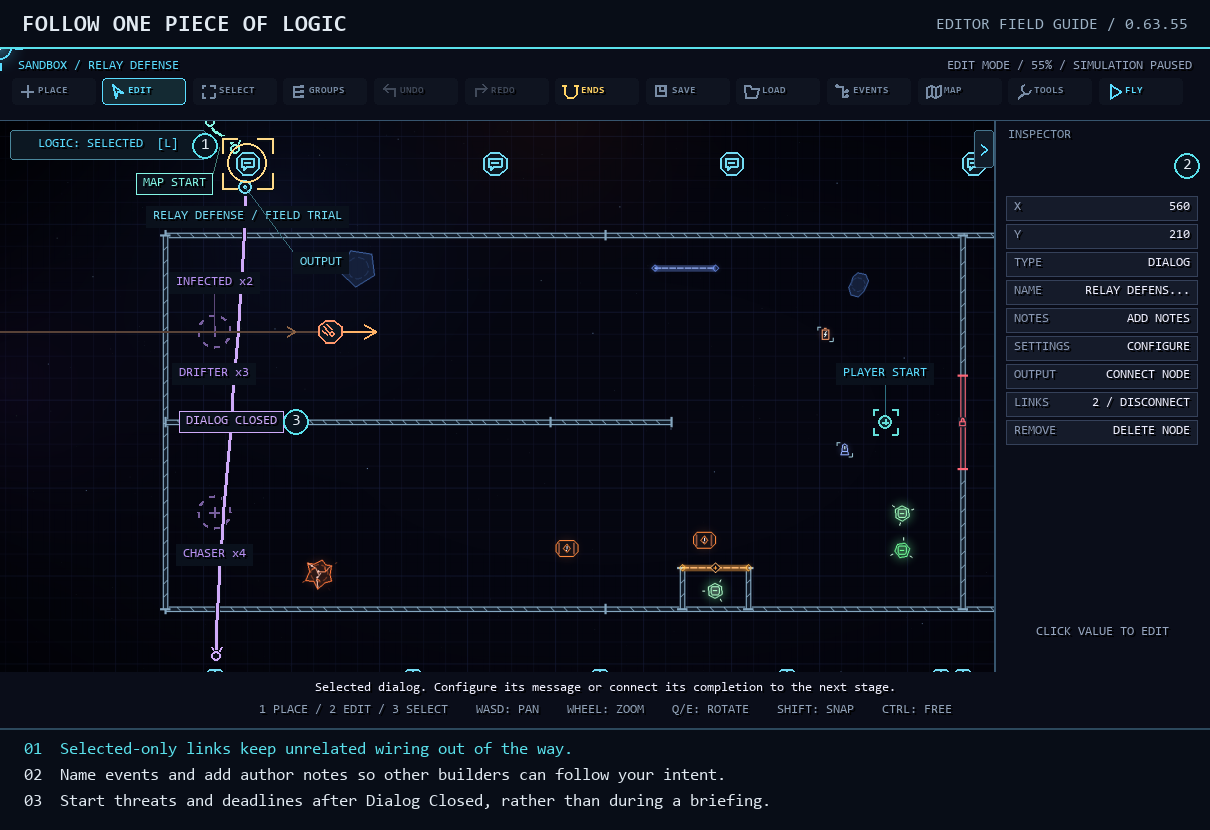
Visibility is an editor aid. Hiding a wire does not disable its rule during play.
Keep related nodes near each other and name them before making lots of copies. The endpoints adjust toward connected objects, but automatic line placement cannot explain a graph whose nodes are all called “Event.”
Example: a timed extraction room
Build this small mission before attempting a huge scenario. The pilot reads a briefing, defeats two targets, passes through a door and collects a relic before the deadline.
1. Place the room
Add a clear Player Start, two enemy sources, one event-locked exit door and a collectible beyond it. Put the collectible somewhere reachable after the door opens. Use a trigger collectible such as a relic, and enable its HUD display if you want the pilot to see objective progress.
Set each enemy source to one MINI, Repeat Off, and linked activation. Do not leave them set to automatic Map Start if the briefing should happen first.
2. Create the briefing
Place a Dialog node named Training briefing. Configure a speaker and a short message: “Defeat both targets. The exit will open. Collect the relic before the countdown ends.” The portrait can remain a placeholder.
Add Map Start → Show Dialog, firing once per map run. Then connect Dialog closed → Start Spawner to both MINI sources. The encounter begins after the pilot finishes reading.
3. Open the door after the targets die
Place a Condition node named Two targets down. Choose Current Run, the MINI kill metric, At least, and 2. Keep it inactive until the briefing closes, then use Arm Condition from the dialog's completion.
For this isolated exercise, those are the only MINI units in the map. In a larger mission, a global MINI count can include unrelated kills; use the specific encounter's completion or combine a stage variable with the required checks.
Connect the satisfied condition to Open Door and to a second dialog named Exit unlocked. Fire these rules once per map run. The second dialog tells the pilot where the relic is and explains the deadline.
4. Start the clock after the instructions
Place a Timer named Relic extraction, with a description such as “Pass through the door and collect the pink relic.” Set it to 90 seconds. Connect Exit unlocked dialog closed → Start Timer.
The named timer appears in the center of the play/Fly HUD. Starting it after the dialog closes gives the pilot the full allowance instead of spending it on instructions.
5. Wire success and failure
Connect Relic collected → Cancel Timer and Relic collected → Finish Map. Connect Timer expired → Fail Map. Set these to fire once per attempt.
The complete chain is:
Map Start → briefing
Briefing closed → two MINI spawners + arm kill condition
Two MINI kills → open exit + extraction instructions
Instructions closed → start 90-second timer
Relic collected → cancel timer + finish
Timer expired → fail
Test it three ways: complete it, deliberately let it expire, then retry after already winning once. The door and current-run kill check must reset on retry. If the exit opens immediately, check that you chose Current Run, not a lifetime profile total.
Conditions, variables and pilot notes
Conditions let you compare current-run stats, lifetime profile stats, achievements and map-local variables. Combine checks with All when every requirement matters, or Any when several alternatives should work.
For a one-time repair-kit explanation, use a map variable such as repair_seen, initially zero. Check that the current run has collected a repair kit and that repair_seen is zero. Show the dialog and set repair_seen to one. Another repair pickup will not repeat the explanation. Keep the rule once-per-run too when it is a single tutorial lesson.
A separate optional vault could require 100 lifetime kills OR the chosen achievement. Tell the pilot about that restriction. Do not make a beginner tutorial impossible because a fresh profile has no achievements.
For instructions during combat, place a Map Note. Choose its title, text, screen position and duration. A duration of 0 keeps it visible until hidden or replaced; a timed note hides after its duration. Trigger Show Note when the objective begins and Hide Note when the actual objective completes. Top, center and bottom positions can each hold a note, so avoid competing instructions in the same position.
Example: a reusable defense assault
Defense tools run in Custom maps. They give you an objective with health, enemies that can leak into it, autonomous towers and a local construction economy. They do not create a new ranked game mode.
1. Place a relay core
Under the Events catalogue's Defense group, place a Core. Give it a unique ID such as relay and a visible name such as Main relay. For a small test, set Health 10, Starting credits 120, and Kill credits 5. Core health is objective health, not the pilot's plating.
2. Route attackers to it
Place an invisible spawner on the opposite side of the arena. Choose an ordinary enemy, Count 3, Repeat Off, linked activation, Goal relay and Leak damage 1. Draw an approach path that ends near the core.
After the final waypoint, goal attackers continue toward the core. Arriving subtracts leak damage once, removes that attacker without kill rewards, and emits a leak event. A destroyed core fails the attempt. Bosses and target dummies cannot be core-goal attackers.
3. Add construction choices
Place a Build Socket near the lane. Choose Gun, set Cost 60, Upgrade cost 40, and Max level 3. Add a second socket set to Slow near a bend. Tune range to cover the route without letting one tower cover everything.
A placed Tower starts already built. A Build Socket starts empty and lets the pilot purchase its authored type. Gun towers deal their own configured damage; Slow towers reduce movement speed. Pilot cards do not become tower upgrades. Hostile turret enemies remain hostile.
4. Create the assault controller
Place an Assault node. Set Prep Time 20 seconds, Repeat limit 5, and Reward 30 credits. Start with little or no health/speed growth until the first assault works. Repeat limit counts the first assault, so five means five total.
Connect Assault Deploy → Start on the member spawner. That link declares membership. Members must have a core goal and be non-repeating, linked spawners. A spawner belongs to one assault controller; do not separately fire the same member from Map Start.
Start the assault series after an opening dialog closes, using Start Assault. Connect Assault Complete → Finish Map. Assault Cleared fires after each round; Assault Complete is the end of the whole series.
5. Play the defense loop
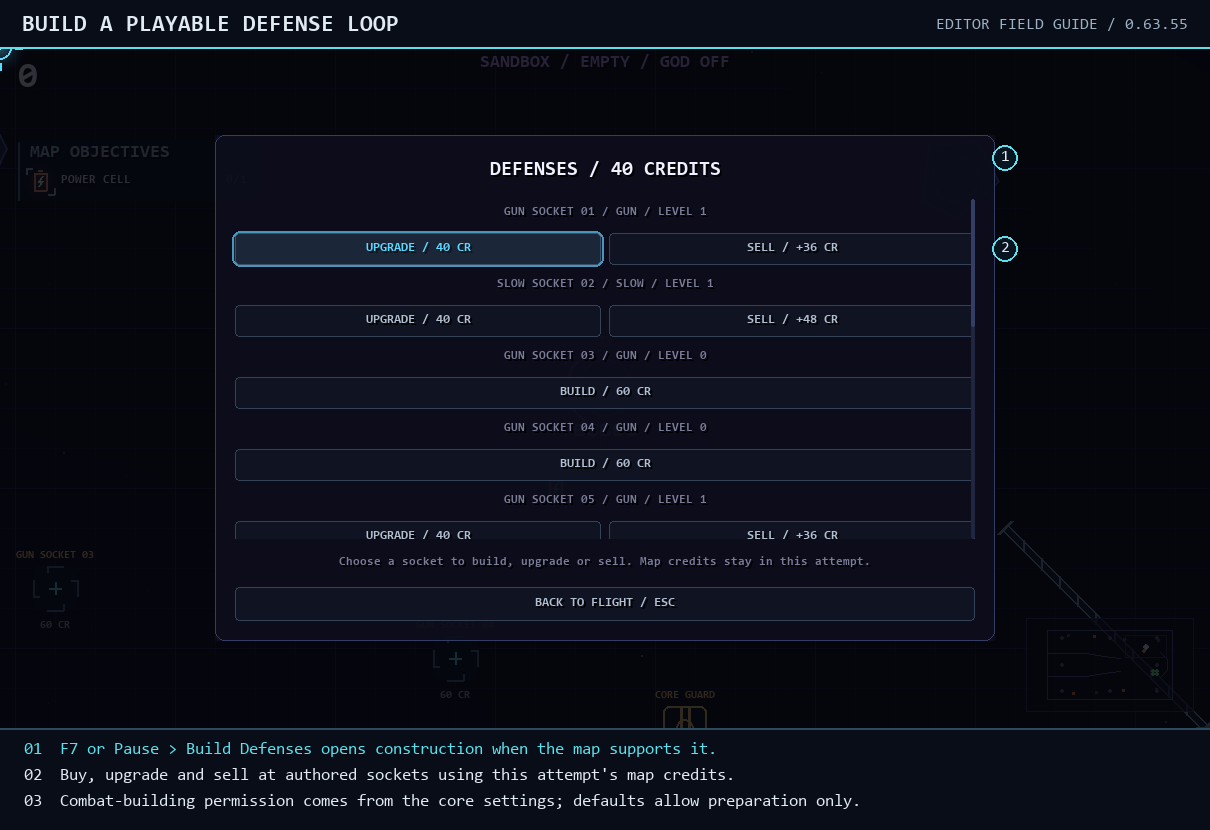
Open F7 / Build Defenses during play, or use Pause → Build Defenses with a gamepad. Construction pauses the simulation.
Buy a tower during preparation, then choose READY to end prep early. By default, purchases are unavailable during deployment/combat; the core's Allow combat build option changes that. Upgrade costs rise with the current level, and selling returns the configured fraction of what you spent. These credits belong only to this attempt and do not use glimmering ore.
Assaults wait for queued arrivals, spawn warnings and live attackers, including split children. Kills and leaks both resolve attackers, but only kills grant kill credits. Use the controller's clear signal for this lifecycle instead of assuming every attacker must die. A leak is not a kill.
Test a run where you build sensible defenses, then another where you buy nothing. Both victory and core loss should be possible. Towers currently do not take enemy damage, and there is no free-placement tower building, branching technology tree or boss routing. Design around the supported sockets and ordinary attackers.
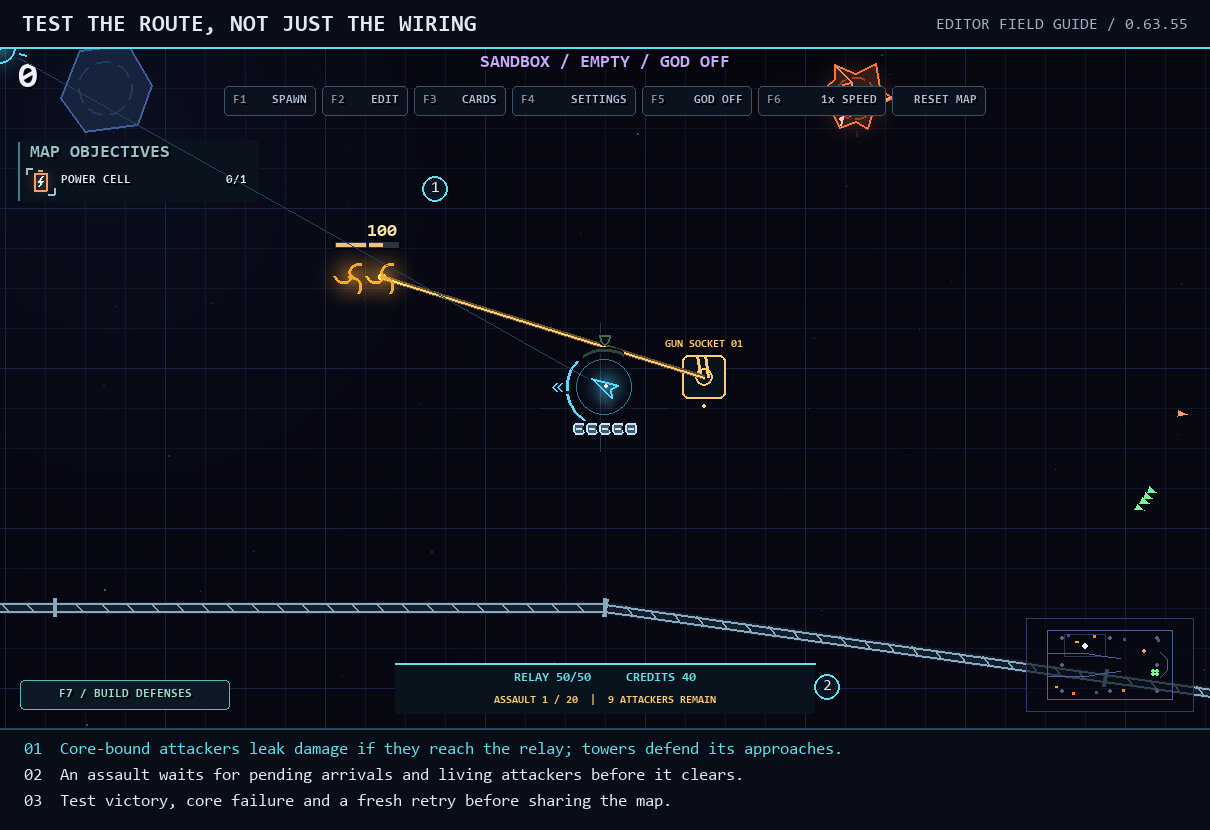
Test the live route as well as the wiring: a clear signal must wait for the attackers that are still on their way.
Work with waves and difficulty
Choose Survival or Boss Rush in Overview to reveal their mode-specific controls. Custom maps do not need the wave picker.
The lower-right layer menu separates View: All Layers from Edit: Map-Wide, a single wave/fight, or an inclusive range. Map-wide content stays active throughout the run; exact and ranged content exists only within its assignment. That means you can leave wave-range gaps where only the shared map remains. Ghost Previous outlines the previous layer so you can position the next one relative to it. In all-layer view, encounter and event labels show badges such as [ALL], [W2] or [W6-10] (F in Boss Rush), making stacked content easier to identify.
Duplicate Wave copies one exact layer into an empty destination, including its internal event links and Native Spawns setting. It does not copy map-wide or multi-wave-range content. Lock Map to All Waves converts the map's scheduled objects to shared, map-wide content as one undoable edit. Cross-wave Ctrl+V likewise requires a destination and creates one copy there, so the source and destination cannot accidentally stack on the same wave.
Native Spawns, in the upper-right opposite the picker, controls built-in spawning for that wave and defaults on. Overview's Spawn Source offers:
- Automatic: native spawning runs normally.
- Placed spawners: the native roster enters through eligible spawners assigned as wave entrances.
- Manual: use authored encounters instead of automatic enemy arrivals.
An unavailable or blocked placed entrance does not silently spawn its enemies somewhere else. An empty manual wave waits for a progression event.
Use a Wave event node for Started or Completed. Select a specific wave number, or zero for every wave. In Boss Rush, these numbers refer to fights. Connect completion to a hazard, a door, a dialog or the next batch of an encounter.
Place a Warp arrival where the pilot should land and assign it to a destination wave or fight. Completing the previous encounter holds the normal transition, carries the pilot through a 1–8 second tunnel, then starts the native automatic or placed spawns after landing. Use only one arrival per destination. Warp Arrived can trigger a note, variable, door or another event after the ship touches down.
Next Wave in Survival and Next Fight in Boss Rush are explicit progression actions. They end the current encounter without granting kills for enemies still alive, then follow normal rewards and the configured final wave. They are not Custom-map victory actions.
Choose the test difficulty in Overview or the mode's tuning pages. Each difficulty retains its own tuning. Apply the draft and save the map before treating it as a reusable preset.
Tune mechanics without changing official runs
Map Settings contains separate Base Stats, Cards and Props libraries. They affect live Sandbox tests in all three Sandbox modes, while regular runs keep official values. Survival/Boss Rush mode and difficulty tuning remains separate and combines with the selected base settings.
| Library | What to adjust | Useful experiment |
|---|---|---|
| Base Stats | Ship speed, health, damage, thrust, drag, warp distance and registered enemy values | Slow a heavy ship, then test the same route again |
| Cards | Availability, stack limits, draft weight and registered effect numbers | Reduce explosive-round frequency without removing the card |
| Props | Supported rock/wall/spawner/lock/pod families and their health or physical behavior | Make a movable obstacle heavier without changing the whole level |
Save a named sheet, apply it and enter Fly. Save the map too: it embeds the active configuration, so another player does not need your separate library file. Use a clear name such as Heavy ship / low thrust / test 02 instead of overwriting an unrelated preset.
Card rarity weight is relative: 0.5 is half the usual draft weight; 2 is twice it. Existing prerequisites and exclusions still apply. Fractional bonuses use values such as 0.25 for 25%.
Outgoing damage and enemy/prop health use 100-point combat units. Pilot lives, plates and incoming enemy damage still use hit counts. Do not turn three pilot plates into 300 just because a blaster deals 100 damage.
Change one thing at a time. Use a target dummy to compare damage, repeat the same route to compare movement, and keep the same difficulty while measuring encounter changes.
Add atmosphere and reusable sections
The Environment page controls the map theme and supported environmental modifiers. Ambient meteor/asteroid intervals can be disabled with zero. A placed Hazard event gives you a more deliberate directional burst: position its anchor, use Aim / Point in Map or rotate with Q/E, configure its warning, timing and per-body speed jitter, and trigger it when needed. Random-area hazards and Random rock fields can use rectangles or circles; a circle treats width as its diameter. Turn off Show region to hide a busy editor overlay without disabling the random area in flight.
The line behind the hazard arrow shows where it comes from; the arrow points along its travel direction. Keep warning lanes readable and avoid starting an unavoidable barrage on top of Player Start.
For repeated room designs, use the Sections library and seeded Generation tools. A reusable section is an authored arrangement, not a substitute for testing the assembled route. Check joins, clearance, objective access and spawn placement in generated layouts. Keep required objectives and their gates logically reachable across the whole map.
Test, reset and save
Press F2 or Fly to run the map. The ship starts at Player Start. F1 opens Sandbox tools, F3 cards and F4 player settings; the visible buttons provide the same entry points. Adding a card from this flight menu changes the test build without completing or advancing the current wave. Reset Map restarts using the cards currently selected for the test. Retry after success or failure restores the card build from the beginning of that attempt, so temporary test picks do not leak into the next try.
Opening a menu during Fly does not mean “start a new map.” Returning to the editor restores the authored map while retaining the editor camera, zoom, selection and history. Loading a different map intentionally begins a different editing workspace.
Before sharing, verify:
- The map starts at the correct location and the first instruction is understandable.
- Required actions can be completed without debug privileges or unrelated lifetime achievements.
- Success works, failure works, and two retries behave like a fresh attempt.
- Timers begin at the intended moment and are cancelled on success.
- Spawners stop or repeat as designed, and enemies can actually reach their destinations.
- Saving, loading and playing the saved copy preserves the same behavior.
Apply commits a settings draft to the map in the editor. Save writes the map file. They are different steps. Save before ending your session.
Use Load → Refresh Files to re-read newly added local files. To play local maps outside the editor, use Play → Custom Maps → Refresh Files, then choose the map. Refreshing local files does not upload them to the website.
Publish a Custom map
Open MAP → Overview / Publishing for the publishing controls. A verified, linked Discord account is required. Set a clear name and description, write player-facing release notes explaining the changes, and publish the Custom map to the Hub.
Version numbers are automatic. Choose the available major/minor update option when appropriate; otherwise the default increment is selected for you. You do not need to type a version number. A local Save alone does not create a Hub release.
The Hub keeps releases, release notes, map previews, reviews and download/play statistics. Author and system metadata are managed separately from editable descriptive fields. Do not treat a local file's attribution as proof that it is an official map.
Survival and Boss Rush tuning maps remain local. Player-made maps cannot provide official-map glimmering ore rewards. If a save appears locally but not on the website, first confirm that you actually completed Publish, rather than only Save.
Troubleshooting quick reference
| What you see | Check first |
|---|---|
| Too many wires to select an event | Press L, search its name, filter its type and select it from the list |
| Nothing happens after a dialog | Use Dialog closed when the next action must wait for reading |
| A lesson repeats on every pickup | Use once-per-run firing and a map-local “seen” variable |
| A retry opens the door immediately | Check Current Run versus Lifetime Profile and resettable stage conditions |
| Enemies appear without your spawners | Check Survival/Boss Rush Spawn Source and Native Spawns |
| A manual wave never ends | Add an actual encounter-clear or explicit Next Wave/Next Fight rule |
| An enemy reaches a waypoint but does not damage the core | Set the spawner's Goal to the core ID; an entrance path alone is not a goal |
| An assault never clears | Look for pending warnings, delayed members or surviving split children |
| A tower ignores a boss or dummy | Current friendly towers target ordinary enemies only |
| A smaller map size is rejected | Move outlying objects and route points inside the new bounds |
| A newly copied file is missing | Use Refresh Files in the appropriate local map list |
| A saved map is absent from the web Hub | Save is local; Publish is a separate authenticated action |
Keep the first version small enough that you can explain its whole progression in a few sentences. Once every step works, expand the space, vary the approaches and give pilots more meaningful choices.